 After posting about the Paper Car 2014 circuit its about time to reveal the final project. In preparation for the Ottawa mini maker faire I have designed yet another paper car. Hopefully the project will run a little smoother than last year. The new design is much simpler to assemble with less soldering and a much wider margin for error while cutting the copper foil. The design minimizes the use of glue so there won’t be any delays waiting for parts to dry. While a bit of glue would stiffen up the design it is not critical to building a car. If desired, people can add glue when they take the car home. I have improved the battery system with a switch and power LED mounted on PCBs but I still consider this the weakest part of the design. That said; it all works just fine and the design is very simple.
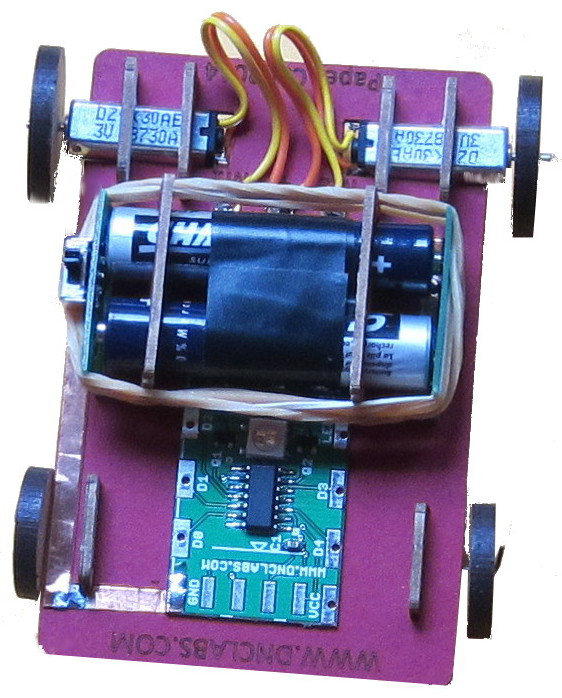
The laser car template is shown here along with a photo of the assembled car. The assembly instructions are located here Car2014_Instructions_page1 and Car2014_Instructions_page2.
Programming the Car
The microcontroller is programmed within the Arduino sketch environment and the code is then uploaded using a custom dongle that has a pin out that matches the car PCB. The following software functions are provided to make it easy for you to write code for your own car.
- Forward(M1_speed,M2_speed,duration); //speed 0..255, duration 0..50000 in ms
- LED_red(); //Change LED colours
- LED_green();
- LED_blue();
- LED_white();
- LED_cyan();
- LED_magenta();
- LED_yellow();
- LED_off();
- delay(ms); //wait for ms. There are 1000 ms in a second
Note that the motors directly drive the wheels so the speed of the car can become quite fast at full throttle. When turning it is best to use low speed and duration values or your car will spin wildly; of course wild spinning can be fun too.
Sample sketch
This sample file is just a starting point based on the code that is initially loaded into the cars micro processor. You can tweak the speeds and duration of the motors as well as alter the light colour and pattern. With these simple changes you can give your car a personality of its own.
#include
PaperCar2014 CAR(1); // 1 LED
void setup() {
CAR.Motor_init();
}
void loop() {
LED_blue();
CAR.Forward(100,100,2000); //M1 and M2 on 2 seconds
LED_magenta();
CAR.Forward(140,0,2000); //M1 on for 2 seconds
LED_red();
CAR.Forward(0,140,2000); //M2 on for 2 seconds
}
The latest copy of the PaperCar2014 library is located here PaperCar2014_library. To install it copy it to the Arduino/libraries directory.