It has been a long time coming but we are finally ready to install OpenWRT. I have provided a pre-built image for this. Using the Uboot loader we can install a new Linux image on our module. This only takes a few minutes so let’s get started. Once you have completed this step you can remotely access and control the HLK-RM04 module.
Wire the module by plugging in the USB mini B connector that provides power and a serial debug port. Next plug an Ethernet cable into the module and your home router. Copy the dnclabs-sysupgrade file to the TFTP directory.
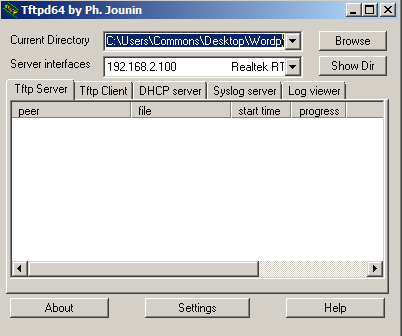
Boot the module with a 57600bps console connected and select option “2” when Uboot prompts you. Start the Tftpd server on your host PC. I use Tftpd64.exe (by Ph. Jounin)on my Windows machine.
The server uses the address of your home computer in my case 192.168.2.100 which I configured on my router. You also need to setup a static route to your HLK-RM04 module which is set to 192.168.2.120 on my router so that the module is given a predictable address. If you only use DHCP the address will change and you’ll have to keep track of this. Instead I map the modules MAC address to a know IP address on my network. This is the address that I setup in my Uboot environment variables from the previous post.
I then set the IP address of the input device to 192.168.2.120 and the input server IP address to 192.168.2.100. The default device and server IP addresses were setup when I configured the Uboot environment variables. The file with the new Linux image is dnclabs-sysupgrade.bin
2: System Load Linux Kernel then write to Flash via TFTP.
 Warning!! Erase Linux in Flash then burn new one. Are you sure?(Y/N)
 Please Input new ones /or Ctrl-C to discard
        Input device IP (192.168.2.120) ==:192.168.2.120
        Input server IP (192.168.2.100) ==:192.168.2.100
        Input Linux Kernel filename (dnclabs-sysupgrade.bin) ==:dnclabs-sysupgrade.bin
Initial configuration
When you first boot the HLK module a serial port connected to the USB mini-B connector will display the boot progress. Let the module boot and wait for all of the log messages to be displayed. Eventually you will be presented with a banner text and command prompt. The first system boot is slow since Linux has to prepare a file system; subsequent boots are much faster. Once you get the command prompt you will want to set a new password so that you can remotely access the module. At the command prompt type “passwd” and enter your new password twice.
Next we need to get our module connected to your home network. This involves modifying two configuration files. In a later post I will show you how to install these changes as part of the Linux build process but for now manual configuration is adequate. It is very unlikely that the network defaults I have chosen will work on your network so we need to customize your setup. Initially we want to get the Ethernet link up and running.
Ethernet configuration
The default “network” configuration file should work without modification. It does expect that your hope router will provide an IP address in response to a DHCP request. The file is located at /etc/config/network.
config interface 'loopback'
        option ifname 'lo'
        option proto 'static'
        option ipaddr '127.0.0.1'
        option netmask '255.0.0.0'

config interface 'lan'
        option ifname 'eth0.1'
        option force_link '1'
        option type 'bridge'
        option proto 'dhcp'
# REMOVE THIS LINE TO ENABLE WIFI:
#       option disabled 1

config interface wwan
        option proto 'dhcp'

config switch
        option name 'switch0'
        option reset '1'
        option enable_vlan '1'

config switch_vlan
        option device 'switch0'
        option vlan '1'
        option ports '0 4 6t'
Type “ifconfig” and you should see that the Ethernet port has been assigned to your IP address. Ping your host computer to test the connectivity of your wired lan.
root@OpenWrt:/# ifconfig
br-lan    Link encap:Ethernet  HWaddr 44:33:4C:CE:AC:32
          inet addr:192.168.2.130  Bcast:192.168.2.255  Mask:255.255.255.0
          inet6 addr: fe80::4633:4cff:fece:ac32/64 Scope:Link
          UP BROADCAST RUNNING MULTICAST  MTU:1500  Metric:1
          RX packets:145 errors:0 dropped:0 overruns:0 frame:0
          TX packets:142 errors:0 dropped:0 overruns:0 carrier:0
          collisions:0 txqueuelen:0
          RX bytes:10493 (10.2 KiB)  TX bytes:12372 (12.0 KiB)

eth0      Link encap:Ethernet  HWaddr 44:33:4C:CE:AC:32
          inet6 addr: fe80::4633:4cff:fece:ac32/64 Scope:Link
          UP BROADCAST RUNNING MULTICAST  MTU:1500  Metric:1
          RX packets:156 errors:0 dropped:0 overruns:0 frame:0
          TX packets:157 errors:0 dropped:0 overruns:0 carrier:0
          collisions:0 txqueuelen:1000
          RX bytes:16323 (15.9 KiB)  TX bytes:15363 (15.0 KiB)
          Interrupt:5

eth0.1    Link encap:Ethernet  HWaddr 44:33:4C:CE:AC:32
          UP BROADCAST RUNNING MULTICAST  MTU:1500  Metric:1
          RX packets:156 errors:0 dropped:0 overruns:0 frame:0
          TX packets:142 errors:0 dropped:0 overruns:0 carrier:0
          collisions:0 txqueuelen:0
          RX bytes:13515 (13.1 KiB)  TX bytes:13209 (12.8 KiB)

lo        Link encap:Local Loopback
          inet addr:127.0.0.1  Mask:255.0.0.0
          inet6 addr: ::1/128 Scope:Host
          UP LOOPBACK RUNNING  MTU:65536  Metric:1
          RX packets:0 errors:0 dropped:0 overruns:0 frame:0
          TX packets:0 errors:0 dropped:0 overruns:0 carrier:0
          collisions:0 txqueuelen:0
          RX bytes:0 (0.0 B)  TX bytes:0 (0.0 B)

wlan0     Link encap:Ethernet  HWaddr 44:33:4C:CE:AC:32
          UP BROADCAST MULTICAST  MTU:1500  Metric:1
          RX packets:0 errors:0 dropped:0 overruns:0 frame:0
          TX packets:0 errors:0 dropped:0 overruns:0 carrier:0
          collisions:0 txqueuelen:1000
          RX bytes:0 (0.0 B)  TX bytes:0 (0.0 B)

root@OpenWrt:/# ping 192.168.2.100
PING 192.168.2.100 (192.168.2.100): 56 data bytes
64 bytes from 192.168.2.100: seq=0 ttl=128 time=1.440 ms
64 bytes from 192.168.2.100: seq=1 ttl=128 time=0.760 ms

--- 192.168.2.100 ping statistics ---
2 packets transmitted, 2 packets received, 0% packet loss
round-trip min/avg/max = 0.760/1.100/1.440 ms
root@OpenWrt:/#
Wifi configuration
From the command prompt we need to modify the “wireless” configuration file so it looks like this. I use The VI editor and there is a quick cheat sheet at the end of the post. The minimal configuration is as follows:
root@OpenWrt:/# cd /etc/config
root@OpenWrt:/etc/config#
root@OpenWrt:/etc/config# vi wireless

config wifi-device  'radio0'
        option type     'mac80211'
        option channel  'auto'
        option path     '10180000.wmac'

config wifi-iface
        option device   'radio0'
        option network  'wwan'
        option mode     'sta'
        option proto    'dhcp'
        option encryption 'psk2'

        option ssid     'enter your netork SSID here'
        option key      'enter your network password here'
After changing the wireless file, power the module off and on again to force a re-boot. Again wait for the module to boot to the command prompt. Type “ifconfig” and you should see that the wireless port has been assigned to your IP address. Ping you the internet ie)google.com to test the connectivity.
root@OpenWrt:/# ifconfig
.
.
.
wlan0     Link encap:Ethernet  HWaddr 44:33:4C:CE:AC:32
          inet addr:192.168.1.130  Bcast:192.168.255.255  Mask:255.255.0.0
          inet6 addr: fe80::4633:4cff:fece:ac32/64 Scope:Link
          UP BROADCAST RUNNING MULTICAST  MTU:1500  Metric:1
          RX packets:14 errors:0 dropped:0 overruns:0 frame:0
          TX packets:9 errors:0 dropped:0 overruns:0 carrier:0
          collisions:0 txqueuelen:1000
          RX bytes:4047 (3.9 KiB)  TX bytes:1576 (1.5 KiB)
root@OpenWrt:/# ping google.com
PING google.com (66.185.84.158): 56 data bytes
64 bytes from 66.185.84.158: seq=0 ttl=57 time=20.760 ms
Remote Access
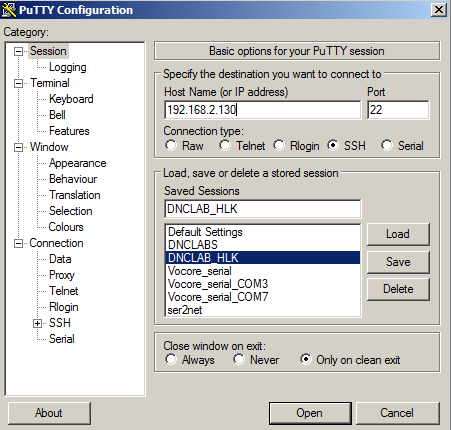
Once you have set a password you can use SSH to securely log into the module. On a Windows machine I use PuTTY.exe. The network access can be wired or wireless depending on which network interface you have setup. To access the module with SSH you need use the IP address assigned to the module which is 192.168.2.130 port 22 for my wired network.
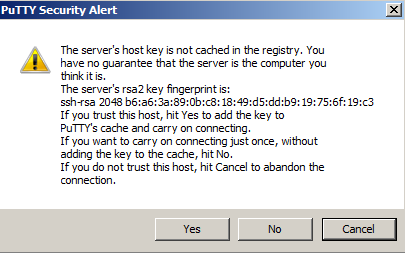
When PuTTY tries to connect to your home router a security notice will pop up because you are creating a secure connection. Accept the notice by pressing Yes. Note that you will only need to verify this when you first establish a connection. Future logons will use these credentials.
To actually login your user name is root and your password is whatever you typed in earlier. The result is that you have connected to your module over Etherent

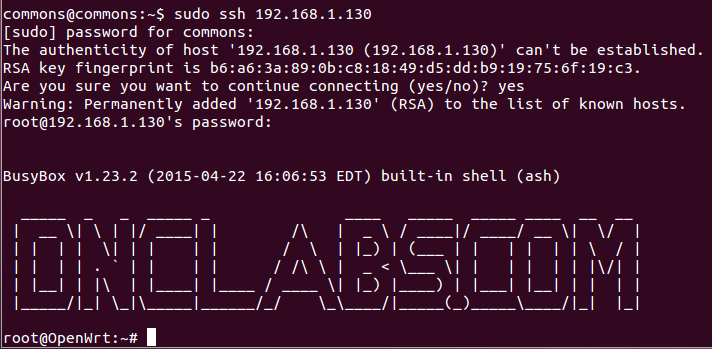
Just for fun I also logged into the module at 192.168.1.130 wirelessly from my Linux computer as follows.
VI commands
The default configurations of openWRT provides a minimal editor in the form of VI. This is a short list of some of the more useful commands that I use to edit configuration files on the module.
General Startup
	To use vi: vi filename
	To exit vi and save changes: ZZ   or  :wq
	To exit vi without saving changes: :q!
	To enter vi command mode: [esc]
Inserting
     	 r        replace character under cursor with next character typed
      	 R        keep replacing character until [esc] is hit
      	 i        insert before cursor
      	 a        append after cursor
      	 A        append at end of line
       	 O        open line above cursor and enter append mode
Deleting
	x       delete character under cursor
	dd      delete line under cursor
	dw      delete word under cursor
	db      delete word before cursor