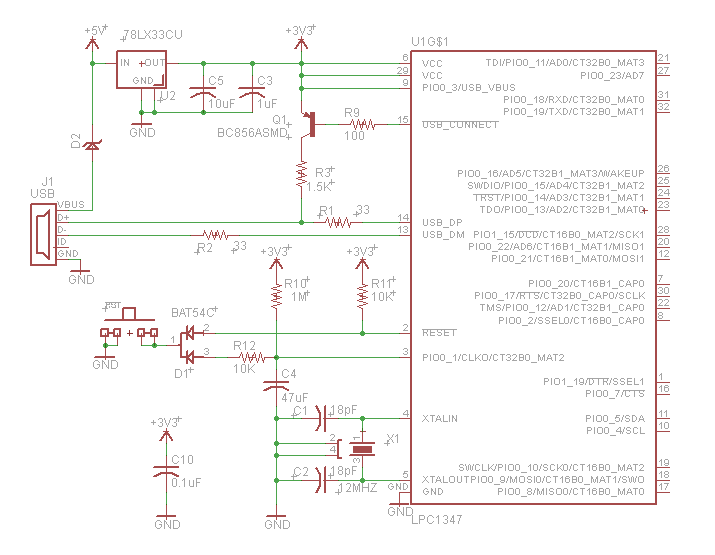
 The minimum hardware to build the development board is shown here. The reset circuit is very important to the design because it allows you to either reset the processor or start the boot loader using a single button. A brief press of the button causes a reset while a longer 1 second press engages the boot loader. When the boot loader starts the LPC1347 looks like a USB Flash memory stick which you can erase and copy a new program to; after a reset your new code executes immediately.
The second detail that is important to note about the design is that you need access to the USB port in order to communicate with the chip. The USB interface allows code to be downloaded as well it can be used as a USB serial port, and finally the USB VBUS lead can power your development board.
If you opt for an LPCXpresso board you will need to add the USB soft-connect and reset circuit yourself.
Hello World
The whole point of creating this library was to simplify getting started using the LPC1347. To create a new project:
- Create a project folder called “HelloWorld”
- Copy the “makefile” to the “HelloWorld” folder
- Create a “src” and “inc” folder in the “HelloWorld” folder
- Open Programmers Notepad and click the “File->New->project” button to make a project called “Hello” in the “HelloWorld” directory. Click OK.
- Open a new “File->New->C/C++” file in Programmers Notepad and save it as “main.c” in the “HelloWorld/src” directory
- Copy the following code to “main.c” and save
#include "../../library/libDNCLABS.h"

int main (void) {
	SystemInit();
	SystemCoreClockUpdate();
	SysTick_Config (SystemCoreClock/1000);	//1kHz (1ms)

	Comport_Init(CDC,9600);                 //Setup communication port
	while (1) {                             // Loop forever
		putchar(getchar());
		printf("Hello World\n");
	}
}
- Right click the “Hello” project icon in the Projects frame of Programmers Notepad and then select “Add New folder” and call it “src”
- Right click the “Hello” project icon in the Projects frame of Programmers Notepad and then select “Add New folder” and call it “inc”
- Right click the “src” project icon in the Projects frame of Programmers Notepad and then select “Add files” selecting the “main.c” file you just created.
- Right click the “Hello” project icon in the Projects frame of Programmers Notepad and then select “Add files” selecting the “makefile”.
- Compile the code by pressing F5 in Programmers Notepad
arm-none-eabi-g++ -W -Wall -I  -fno-common -Os -std=gnu++98  -mcpu=cortex-m3 -mthumb  -ffunction-sections -fdata-sections -g3 -D__USE_CMSIS=CMSISv2p00_LPC13xx -I../CDC_library/inc/ -I../CMSISv2p00_LPC13xx/inc -I../library/ -c src/main.c -o src/main.o
arm-none-eabi-ld -Map=main.map -T../library/LPC13xx.ld --gc-sections -nodefaultlibs -nostartfiles  src/main.o  ../library/libDNCLABS.a -o main.elf
arm-none-eabi-size main.elf
   text	   data	    bss	    dec	    hex	filename
   4052	      4	   2456	   6512	   1970	main.elf
arm-none-eabi-objdump -h -S main.elf > main.lss
arm-none-eabi-objcopy -R .stack -O ihex main.elf main.hex
arm-none-eabi-objcopy -O binary -j .text -j .data main.elf main.bin
checksum -p LPC1347 -d main.bin
Created checksum 0xefffdab6 at offset 0x1c in file main.bin
- Press and hold the reset button for 1 second.
- Press F7 to download the code to the LPC1347.
- Press the reset button briefly and it should enumerate as a COM port.
Final Note
The library size that gets linked into your code varies depending on the features you select. The minimum code impact is ~4K; using formatted printf() statements adds ~10K to the code size. If you are use to small AVR and PIC’s you might find this concerning however the LPC1347 has 64K bytes of Flash so there is still plenty of room for you own code.