In this step we install a set of tools that allow you to build the Uboot loader. This is not generally required because I have created two Uboot images for your use. However if you want to change Uboot this tool path installation will let you customize your Linux install. It is also possible to run C code directly from the Uboot loader without even installing Linux.
Install the Uboot SDK 4.0 source directory
We need a copy of Uboot so I downloaded the source code from stevenylai/ralink_sdk
The Uboot version is 1.1.3 while the Ralink SDK version is 4.0.1.0. From a terminal window execute the following commands to create two Uboot images; one for each of the two modules (16M or 32M).
cp ralink_sdk-master.zip to your desktop
cd Desktop
unzip ralink_sdk-master.zip
cp -r ralink_sdk-master/Uboot Uboot1.1.3
cd Uboot1.1.3
Additions to Uboot
I included the SPI flash definition for the SPI flash used on the Hi-Link module. Edit the /Uboot1.1.3/drivers/spi_flash.c file and add the following line of code (at line 288).
{ “Pm25LQ032C”, 0x7f, 0x9D467F9D, 64 * 1024, 64, 0 },
Make Uboot
On your Linux computer desktop you will have a Uboot4.0 directory after following the Ubuntu installation procedure from the previous step. Using these steps I was able to build the Uboot.img file that was loaded over the factory default module.
Caution: While it is easy to build and modify Uboot it can cause grief if you overwrite the working bootloader. If you want to play in this area make sure you use a system like my test bed (the one with the Flashrom loader in an LPC1343) that allows you to re-flash the SPI no matter what the content is. You absolutely need a way to reprogram the SPI flash to recover from bootloader crashes.
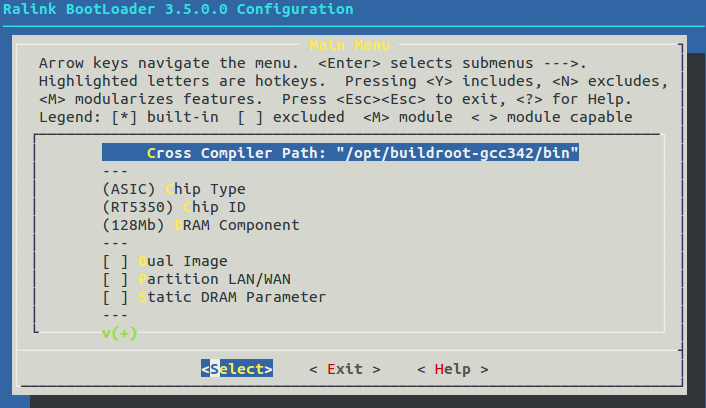
The procedure to build a new Uboot image on a Linux computer or virtual machine is as follows. We start by opening a terminal window and enter the Uboot4.0 directory. For a fresh install you can use the “make distclean” option which will compile everything from scratch. It also erases your configuration file so you will need to reset that to your required configuration. To define the specific features of the Uboot build use “make menuconfig” and select the following features. Make sure you build for your modules memory size. I recommend only buying the 32M modules because it allows for more complex features without hitting any memory limits. The 16M system is marginal for anything but light weight applications.
UART WIFI Module (16Mbyte)
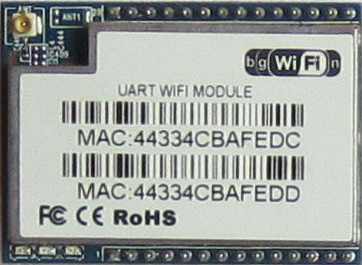
(ASIC) Chip Type
(RT5350) Chip ID
(128Mb) DRAM Component
4Mbyte SPI FLASH
16Mbyte DRAM
2 UART
UART WIFI Module-B (32Mbyte)
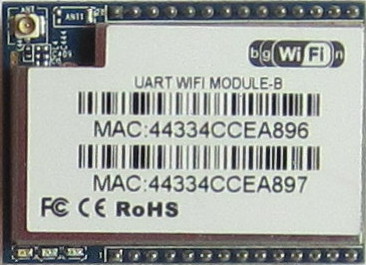
(ASIC) Chip Type
(RT5350) Chip ID
(256Mb) DRAM Component
8Mbyte SPI FLASH
32Mbyte DRAM
2 UART
Then you can exit and save these options. Follow this with the “make” instruction to build Uboot.
cd / Uboot1.1.3
make distclean
make menuconfig (use these ASIC,RT5350,128Mb)
make
cp uboot.img uboot16M.img
make menuconfig (use these ASIC,RT5350,256Mb)
make
cp uboot.img uboot32M.img
The final uboot.img file is located in the /Uboot1.1.3 directory.